
Settings Manager - user manual
Settings Manager - user manual
1. About the program
Settings Manager is a batch file created to easily manage the set of iStripper settings. It allows you to easily save (export) iStripper settings in external files and to restore (import) them later. The script also allows you to choose your own default set of settings, which can be imported at any time using a special shortcut.
Thanks to the easy and quick export/import, you can quickly switch active scenes (Full screen tab) and music tracks (Music tab). This is especially important when you have a lot of scenes and music in your collection. The exported settings can be transferred between different copies of iStripper, between different computers, and between different users.
Settings Manager works on Windows systems. It has been tested with Windows XP SP3 (32-bit) and Windows 7 SP1 (64-bit), but should also work in newer versions of Windows. Settings Manager was tested with the iStripper 1.2.190.
2. Installing
1. Unzip the contents of the settings_manager_for_is.zip to any directory and run the install.bat file by double-clicking it. This is how the installer looks like:
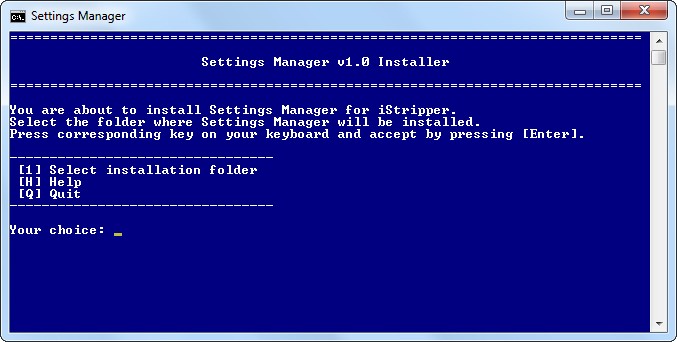
2. In the first step of the installation process select the path to the directory in which you want to install Settings Manager. Press the [1] key on the keyboard and confirm with the [Enter] key. The folder selection window will be displayed:

3. Select the directory in which you want to install Settings Manager and confirm your selection by clicking OK button. The selected directory will serve as the target path in which the installer creates a folder named Settings Manager for iS. It will contain the program's component files.
4. In the next step, the installer asks whether you want to create a shortcut to the Settings Manager. The shortcut will be placed on the desktop. Depending on the choice, press [Y] (Yes) on the keyboard or [N] (No) and confirm with the [Enter] key.

5. In the last step you will see a summary of the selected settings and a confirmation request. If you want to make any changes, select the [B] (Back) key. If you don't want to change anything, press the [1] (Install now) key and confirm with [Enter]. Copying of files starts. It usually takes a second or three.

6. The installer will notify you when the installation is complete with the message shown in the figure below. You can close the installer by pressing any key on the keyboard.

INFO: At every step of the installation, you can stop it by pressing the [Q] key and confirming it with the [Enter] key. Selecting the [H] key (accepted with Enter) will display a short help for the given installation stage. Selecting the [B] key (accepted with Enter) allows you to go back one step.
3. Uninstalling
Uninstalling Settings Manager comes down to removing all of its component files. During the installation, the program does not save any files in other directories than the one you selected during its installation. It also does not write any entries in the system registry.
To uninstall Settings Manager, go to the directory that contains the Settings Manager for iS folder, right-click on it and select Delete. You can also drag the Settings Manager for iS folder to the trash bin icon.

If you created a shortcut on the desktop during the installation, delete it in the same way as the Settings Manager for iS folder (by removing it to the trash bin).

4. Interface (GUI)
You can start the Settings Manager program by double-clicking the manager.bat file. It is located in the installation directory, in the Settings Manager for iS folder. If during the installation you have chosen to create a shortcut on the desktop, you can start the Settings Manager program using the shortcut.
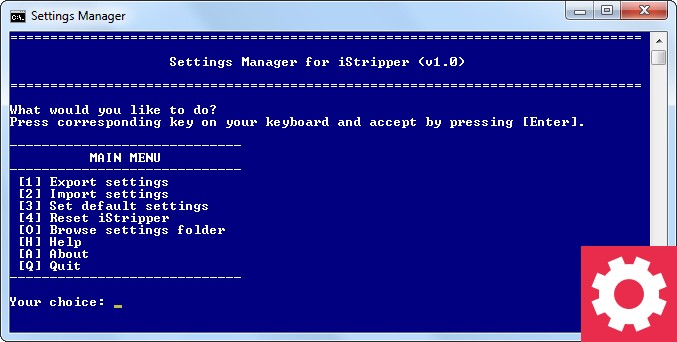
After launching the program, a window will appear as in the figure below:

Settings Manager is a batch file, so it does not look very beautiful, but its main task was not to be beautiful. Its main task is to easily manage iStripper settings and it works pretty well in this matter.
Navigating in the menu consists of selecting the appropriate keys on the keyboard and confirming the selection with the [Enter] key. Each action has a separate key assigned. In the Your choice field, the currently selected key is displayed.
The following options are available in the main menu:
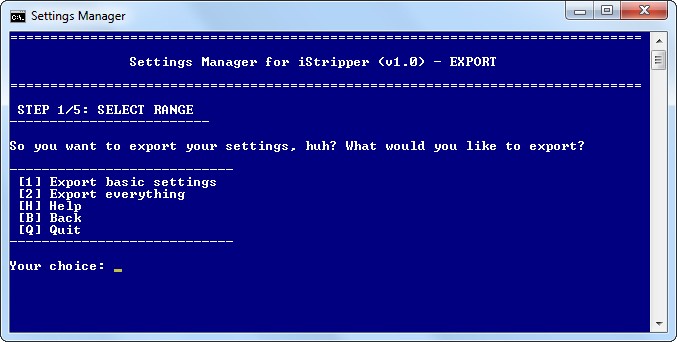
- Export settings - starts the process of exporting settings. Select this option if you want to save the current iStripper settings.
- Import settings - starts the process of importing settings. Select this option if you want to restore previously saved iStripper settings.
- Set default settings - saves the selected settings as default and creates on the desktop a special shortcut to the iStripper program.
- Reset iStripper - restores the iStripper settings to the factory default.
- Browse settings folder - opens the explorer window in which the exported settings are saved.
- Help - displays short help about the Settings Manager program.
- About - displays short information about the program and its author.
- Quit - closes the Settings Manager program.
The program guides you through the export and import process, displaying short instructions at the top of the window. In some situations an additional, slightly broader description is available. To display it, select the [H] (Help) key.
In most cases, the user can go back one step in the export/import process. An additional option [B] (Back) appears in the menu.
In some situations, going back one step is impossible, especially where the user is asked to enter a file name or a description using the keyboard. This is due to the need to use the keyboard for other purposes than navigation. The use of the navigation keys would not work in such situations.